"And then she recalled Katy's voice saying: 'Braids round your head.'
'Of course', said Linda, 'that would be the thing to do...' "
- From "Her Father's Daughter" by Gene Stratton-Porter

When "a Sister in Christ" asked about hair braiding on my post of
Fair Photos, I promised to write up my answer as another post "soon". :) Well, I didn't forget, but one long trip and several very busy weeks later, I'm taking the time to do it! But I'm taking the time to do it well. So, to the friend that asked, and anyone else who may have seen my promise and wondered what became of it... hope you find it to be worth the wait!

Mom's braid for her 25th Anniversary celebration this past weekend...and this photo was taken after it was in all day! (Not a bit of hairspray, either).
~ ~ ~
I think the art of hair braiding can be a very lovely exterior reflection of interior femininity. The "look-like-you-just-rolled-out-of-bed" look is rather too widespread if you ask me. And I think we see way too much of the same, cloned style of hair on young ladies my age... you know, the meticulously dyed and highlighted, specific-length, strategically (unstrategically?) chopped -- um, layered -- cut, the half-grown bangs in the eyes... This is not to say that I think all layered hairstyles unbecoming, just that too often, I see haircutting jobs that look rather like a 3-year-old got a hold of the scissors!

A braid done on myself
Anyway, my purpose here is not to rant about hair cutting, but to discourse a bit on one of the things I love to do: hair braiding. The two do fit together, of course -- since I'm a firm believer in one simple, preliminary rule for all hair care, styling, and braiding: natural is best. So the first step to modeling lovely "dos" is to keep the hair naturally healthy and beautiful, clean and fresh. Consider throwing out the cheap shampoos with "Sodium Lauryl Sulfate" as the first ingredient (that's right: go look!), and get an herbal or botanical shampoo and conditioner from the health food store! The extra dollars you may spend on it will be worth it!

French braids done on very fine hair
~ ~ ~
Okay, now that I'm done my little treatise on hair care -- who knows: perhaps another complete post will follow on that sometime? Especially if readers ask for it! :) -- let's proceed to the theme of this post.
For as long as I can remember, I've enjoyed learning how to "do hair". My mom is a practical one, so she was always good about keeping our hair out of our eyes when my sisters and I were small. In other words, you didn't often see us with unbrushed, straggly locks needing to be pushed back from our faces. :) We have fun looking through old photos, because even though she's practical, Mom also enjoyed bedecking our simple ponytails or braids with cute, girly bows or barrettes. Getting a french braid done was a special treat when we were little -- Mom knew the concept, but on a special occasion when we might want to get one, she'd need to have us reach back and hold some of the pieces for her. She'd always laughingly argue that she "didn't have enough fingers". :) But as soon as we were past toddler stage, Mom wisely taught us how to care for our own hair: the daily ponytail, simple braid, or bangs clipped back became our own responsibility.

An "original creation" with french braid up the back
~ ~ ~
A "Camp" braid (done at Ave Cor Mariae)
 Another "Camp" braid: The Crown
A style I invented for shorter but very thick hair 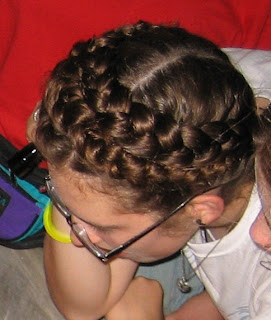
I used to watch, rather in awe, as aunties or friends would french braid. I remember peppering my Aunt Rita, who'd do our hair when she came to visit, with questions about "how you do it"! Every once in a while, I'd grab (victimize?) one of my sisters and make an attempt, but for a couple years -- I was probably around 7 or 8 at this point -- would just get frustrated with the results. I somewhat got the concept, but, well, applying it was a bit more difficult. Being perfectionistic and artistic, I of course envisioned exactly how I wanted my attempts to turn out, but for a little while they just weren't that way. I even remember writing about them in one of the required paragraphs in my English workbook, titling it "I can't french braid!" :)
 A crown for Sarah on her last birthday
View II 
 View III
View IV (!) 
 The crown is very elegant...and oft requested!
~ ~ ~
The biggest mystery to me was how anyone could french braid their own hair. I used to never believe it when ladies would tell me that they not only could do their own, but found it easier than doing others' hair. I thought, Goodness, I'll never be able to do my own!

"Hugs and Kisses" (x & o) braid

Another view... this braid is done by dividing the hair into four sections, and then french braiding curved, then diagonally to make the "x"

Top view
~ ~ ~
Well, then one evening when I was about eight, while playing with my hair before bed, I suddenly ran to the mirror and realized I'd french braided it. And I suppose you could say the rest is history. :)
(About whether or not doing your own is actually easier... from a visual standpoint, of course doing someone else's is easier, but I've found that the angle is somewhat easier on oneself. So I'm concluding that's what those other ladies meant.)

"The Sarah" (two french braids going into one french braid)
~ ~ ~
I quickly found that doing hair appealed to both the artistic and girly sides of me. And, I've since found, it can actually be a work of mercy, and a beautiful way to bond with other girls (even ladies!) of all ages.

A crown done on shorter hair (just below shoulder-length!). There are two ways of doing the crown -- one works exceptionally well for shorter hair.
~ ~ ~
I've been asked probably hundreds of times how I learned to do hair, and usually I tell a mini-version of the story above, but really, the best advice I have to offer is 1. use your eyes and logic, 2. don't be afraid to make mistakes and take them out!, and 3. just start practicing!
 One of my more complex "originals"
Can you find the "x" braid?
~ ~ ~
There are various "hair books" out there, I know, and I've seen some that are neat and informative. But nothing can substitute for experiencing the real thing. I've found that I can glean great ideas from photos and movies, or just from watching another braider. Have you ever tried reconstructing a hair-do from a movie? Try it!
Updo spiral of very long, thick hair
 "The Sarah" on myself
~ ~ ~
Some basic tips:
- Ladies' hair of almost any length can be braided, as long as it reaches at least below the ears. I am often able to achieve very nice results even with the bangs of short hair that isn't long enough to all be put up.

Tiny 5-strand french braids going into a twisted updo, done to accompany the regency gown a friend was modeling in a fashion review! Can you tell I had fun on this one? :) (But when don't I?)
~ ~ ~
- Thickness and fineness of hair are two factors that always need to be taken into consideration. Thickness means how much hair is on the head. Fineness refers to the individual strands. Curly hair tends to be thicker, often coarser strands, and very straight hair is often fine (although it can be fine and thick).

A "braiding line" at ACM Camp this summer. :)
~ ~ ~
- It is helpful to have a spray bottle of clean water on hand for doing fine hair, since it has the tendency to "escape" or slip from the braid quicker; sometimes as you're doing it. I've both seen done and done very fine "unbraidable" hair into a nice, tight braid simply by wetting it down.

Not a braid, but a twisted updo for Miss H., for her Queen Esther role in the skits at camp!

Everyone agreed that she looked ready for a wedding. :)
~ ~ ~
- A good, sturdy brush and comb are indispensable. And a nice stash of bobby pins should always be kept on hand. :) I have found that the big, oversized bobby pins often sold as "roller pins" (although they look just like extra-large bobby pins) work fabulously for extra-long or thick hair.

A circle of dancing maidens at camp... notice all the braids! (The result of the daily braiding workshop I led: if I didn't do these, I probably was teaching someone who did them). :)
~ ~ ~
- Use no-metal hairties that match the color of your hair for the best results, especially if the braids are going to be put up. Or the little clear "braces" rubberbands can also work! (I can't tell you now many times a stash of these and a comb carried with me led to some lovely results). :)
+265.jpg)
Braids for the 8-9 year-old maidens at CCL 2006 when I helped in childcare...
~ ~ ~

Veronica's birthday hairdo a few years ago
~ ~ ~
- Start with a basic braid, and branch out from there. A good way to practice the standard french braid is to first gather the bangs back into a smooth barrette/clip, so they stay in place when you separate them into 3 sections. If you've ever braided just the upper half (or quarter) of someone's hair, this is the first basic step to the french braid. You divide the bangs into 3 sections, and cross the left over the middle, then the right over the middle (just one time each). Then you gather a small section of hair from the right side, and add it to the piece now on the right before crossing the now larger piece over the middle. Repeat the same process with the left section, cross to the middle, and so on. I would write more detailed instructions, but there are some places online that already have them (with pictures too -- how neat is that?), so I will just share some links at the end of this post!

Three sisters with matching braids and smiles!
~ ~ ~
Since no doubt there will be one or two that come back and ask about 1 Timothy 2:9 and 1 Peter 3:3, where the beauty of woman is described as "not coming from braided hair", I'll briefly share my thoughts on them. We've had discussions on this around the dinner table -- is hair braiding by nature going against the advice of St. Paul and St. Peter? I think not, and this is why: The good apostles are talking about a certain kind of womanhood in their counsels. They aren't just referring to the act of braiding hair, but the kind of excessive external adornment, painting, and ornamentation which in those days distinguished "ladies of the night", or women of sinful intent. In 1 Corinthians 11:14-16, Saint Paul counter-balances his advice by saying,
"Does not the very nature of things teach you that if a man has long hair, it is a disgrace to him, but that if a woman has long hair, it is her glory?"
So in short, could braiding hair be sinful? Well, of course, if the motive is prideful or nurses vanity. And no, it's probably not a good idea to spend an hour a day doing hair (or any personal care for that matter). But some thoughtful attentiveness to harmonize our accessories and hairstyle with our feminine attire can add to the polished reflection of our inner femininity, and hopefully, a vivid picture of the Proverbs 31 woman who is "clothed in fine linen and purple" (verse 22).
I love that word, "harmonize". It should help us keep things in order -- the harmony can't take prescedance or overpower the melody because then, well, we'd have a rather unbalanced song. But if we work to send forth a pure, sweet melody, and then add the gentle depth of harmony, we've just enriched the whole piece.
+269.jpg)
My favorite braiding websites:
http://www.braidedimage.com/
http://www.dreamweaverbraiding.com/
http://www.melissasbraids.com/
http://www.tressesentwined.com/
http://www.hairbraidingbyellen.com/
(Disclaimer: Not necessarily all insights presented, photos and/or advice given on these sites are 100% in line with my values, but they do provide many helpful tips, instructions, and examples! You will notice that some of the braid photos are rather extravagant -- probably more so than I'd ever do or want done on me -- but there are also many lovely photos. Enjoy!)


+265.jpg)


+269.jpg)


